First Mod
What you need
- Risk of Rain 2
- Visual Studio 2026 Community
- Make sure that when installing Visual Studio that the .NET desktop development workload is ticked. In the case you already have VS installed you can get back to the window below by opening the Visual Studio Installer and clicking on the Modify button.
Install BepInEx, HookGenPatcher and R2API
It is recommended that you install these prerequisites using a mod manager (r2modman/thunderstore mod manager), and in a profile separate from the modded profile you play the game with.
BepInEx
BepInEx is a tool that allow us to load the mods into the game.
-
r2modman
-
Download the BepInExPack and click "install with mod manager"
-
Manual Install
-
Follow the instructions here.
HookGenPatcher
You also need HookGenPatcher, it allow us to generate a dll assembly (Name is usually prefixed with MMHOOK_) for hooking the game methods.
-
r2modman:
-
Download the HookGenPatcher and click "install with mod manager"
-
Manual Install
-
Download and follow the instructions here.
R2API
The example plugin mod uses some R2API modules as dependencies, it provides helper methods to quickly integrate custom additions into the game.
-
r2modman:
-
Download the R2API Items and click "install with mod manager"
-
Download the R2API Language and click "install with mod manager"
-
Manual Install
-
Download R2API Core. (R2API Core is a dependency of R2API Items and R2API Language)
-
Download R2API ContentManagement. (R2API ContentManagement is a dependency of R2API Items)
-
Download R2API Items.
-
Download R2API Language.
Manual Install Only: For installing them just drop the dll files into BepInEx/plugins.
Getting the Example Plugin
Download the example plugin from here.
Extract it.
Building the Example Plugin
Open the .sln solution file with Visual Studio.
Make sure the Debug Configuration is selected, there is two configuration available, Debug and Release, Debug will allow us to have .cs lines showing up in stack traces in the console log, which is incredibly helpful for figuring out programming mistakes.
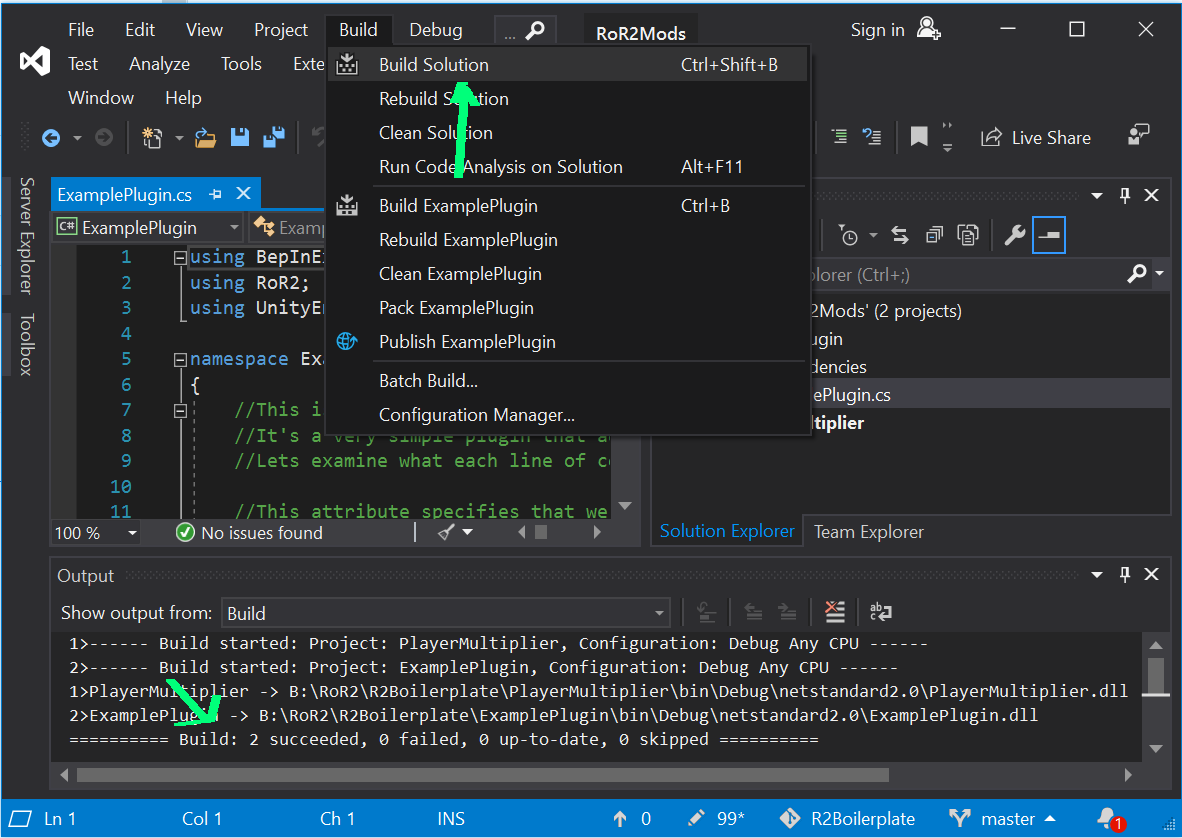
Now build the solution:
Put the mod in the game
Find the ExamplePlugin\bin\Debug\netstandard2.0\ExamplePlugin.dll and ExamplePlugin\bin\Debug\netstandard2.0\ExamplePlugin.pdb on your own machine.
-
r2modman:
-
Copy the
ExamplePlugin.dllandExamplePlugin.pdbto yourBepInEx/plugins/folder. You can find the folder by opening r2modman, going to settings, and clicking Browse profile folder. -
manual install:
-
Copy the
ExamplePlugin.dllandExamplePlugin.pdbto yourGame Folder/BepInEx/plugins/folder.
Testing the mod
If it's your first time ever launching the game with the latest BepInEx Pack, you may have notice the BepInEx GUI has a console, it has multiple features that could be useful to you:
-
Pausing / Resuming the game process
-
Copying / extracting some log entries by selecting them (you can drag) and pressing Ctrl+C
-
Filtering log entries by text or their log level
-
Filtering by mod name
-
Can close the game and the GUI very quickly by pressing CTRL + F5 while the GUI is focused
The console overall is very useful for debugging your code alongside the Visual Studio debugger if you follow this tutorial
When logging stuff to the console, don't forget to use the dedicated Log class available in the example plugin!
Once the game launched:
-
Go in singleplayer.
-
Press F2. Our custom item should be spawning.
To go further
The sidebar is very useful for navigating the wiki (please navigate it through the github io page)
Must see pages:
-
C# Assembly References (aka how C# .dll file dependencies work)
-
How to load / modify any game assets
-
Understanding Unity Principles
Github
This step isn't strictly necessary but it is good practice to use source control and the most commonly used source control with C# in Visual Studio is git.
You should be using this and synchronising your repository with github.
To do this from Visual Studio follow these simple steps
If you encounter any problem following this tutorial or have suggestions to make it better, feel free to edit the wiki page directly and drop a message in the modding discord